The release of iOS 11 will change how you use your iPhone and iPad. The update comes with many useful features that increase the productivity of your device. For instance, there is an independent “Files” app where you can easily organize the files you stored on iCloud Drive and iDevices. With this, you won’t need to use your Mac to access your documents. Another improvement from the update is its built-in screen recorder. We all know that the old OS only allows you to take screenshot. Now, this additional feature provides you a new way to capture your screen performance without depending on other applications. To know how to record screen on iOS 11, read along.

How to use iOS 11 screen recorder
How to enable iOS 11 screen recording
Before you begin recording your iPhone/iPad, you must enable the recording function on the device.
- First off, head to Settings on your device.
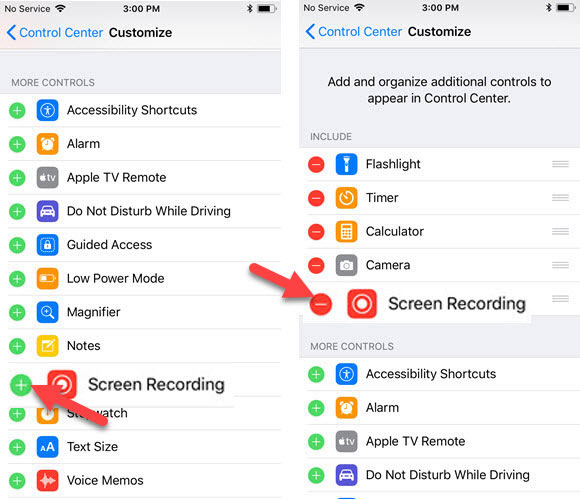
- Next, go to Control Center and scroll down until you see Screen Recording.
![Go to control center]()
- Now, hit the green “+” button located beside Screen Recording to add it to your Control Center.

How to start screen recording
Once you enabled the screen recorder, you can now capture your screen.
- Open your Control Center by swiping up from the bottom of your iPhone/iPad.
- Look for the Recording icon and tap on it.

How to record sound from microphone
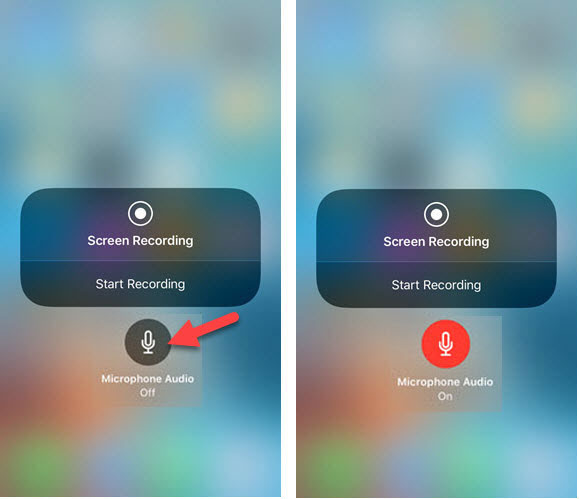
- If you want to record sound coming from your microphone, touch and hold “Recording” icon.
- After that, a new window will appear. Tap on “Microphone” icon to enable the microphone on your device. Finally, hit “Start Recording” to begin.
How to stop screen recording
There are two ways to save your recording to your phone.
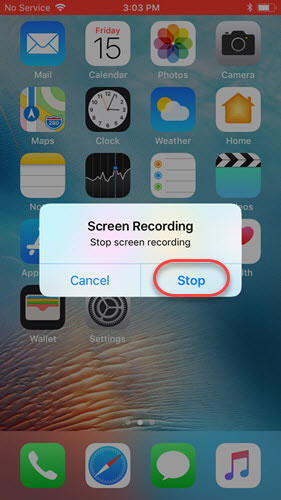
- One way is to tap on the status bar on top of your screen. Once a popup appears, tap on “Stop”.
![Stop screen recording]()
- Another way is to open your Control Center then touch and hold Recording icon. Now, hit “Stop Recording” button.
How to edit the recorded video
- If you want to edit your file, go to the Photos app on your device. Next, select it as your footage.
- Hit the “Edit” button found at the bottom of your screen.
- To cut files, tap and hold the anchor on either side and then move it left or right. The highlighted portion indicates the remaining part after you trim the file.
- Once you’re done, hit “Done”.

Recommended tool- ApowerREC (iOS)
In recording your screen activities directly on your iOS devices then the finest way of doing it is by using a tool called ApowerREC for iOS. This reliable mobile application does not require any system jailbreak for it to work. With just few tap you’ll be able to capture screen movements just like game plays, video calls, and many more. After recording, you can further manage your video clip by selecting the resolution that your prefer, trim unwanted parts, add audio narration, and lastly insert your camera feeds. As you can see, this mobile screen recorder provides added functions aside from screen recording making it a better application to be used. Plus, it supports device with iOS 11 and up.
To record your screen with this app, here’s what you need to do.
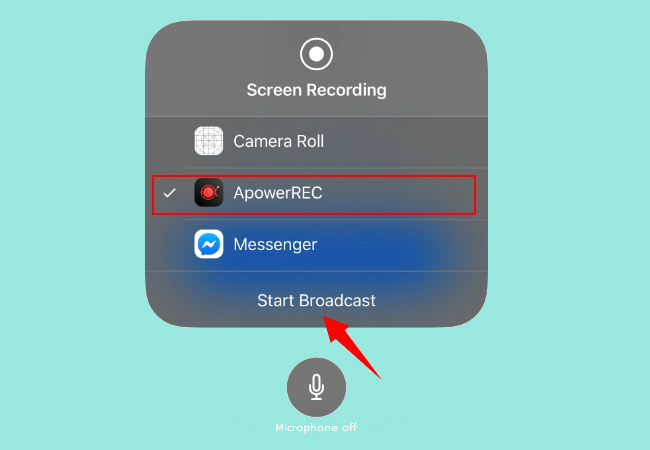
- Get and install this iOS recorder through the download link below.
- After that, select “ApowerREC” and then press “Start Broadcast” to initiate the recording.
- Now you can open anything that you want to grab from your screen.
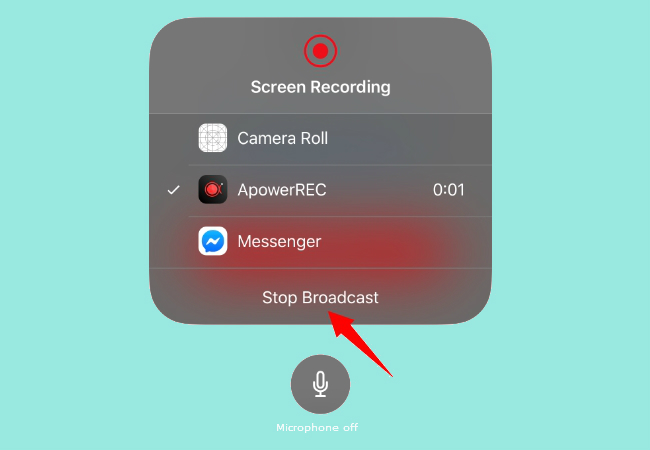
- When you’re done, open back the screen recorder and this time press “Stop Broadcast”. The recorded file will then be saved inside the tool’s media list.
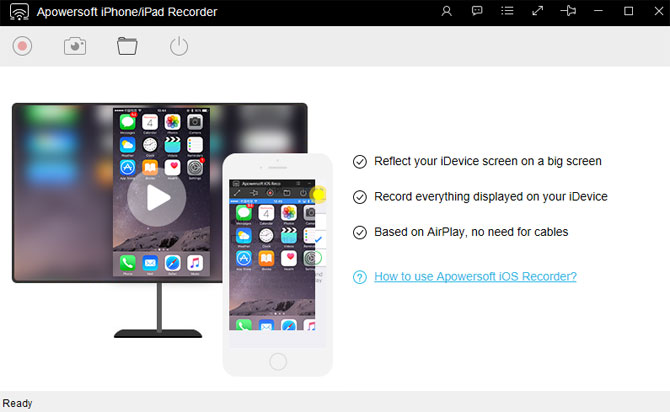
Alternative tool – Apowersoft iPhone/iPad Recorder
For more advanced functions, it is recommendable to utilize a professional application. One example of a great alternative screen recorder for iOS 11 is Apowersoft iPhone/iPad Recorder. This application is designed to mirror your iOS devices to Windows and Mac and record the screen activities. It has a simple and intuitive interface which allows you to easily locate the buttons needed. To connect your device to computer, use the same network on your device and computer.
In terms of its capturing capability, Apowersoft iPhone/iPad recorder offers different output formats such as MP4, WMV, AVI, MOV, etc. You are allowed to set the video quality as high, standard or low and the display quality as 1080P or 720P. Moreover, you can capture audio from microphone and system sound simultaneously or independently.
Tips about iOS screen recording
Because of the limitation of iOS devices, it’s very difficult to find a screen recorder that works perfectly. In some way, the app will fall short. So, what are the aspects you need to check?
- Obviously, you must have an app that can produce a high definition output.
- Also, you must look for an app that supports different video formats (for compatibility purposes) and recording from different audio sources.
- Furthermore, check if you can capture your device on any orientation, may it be portrait or landscape.
- The most important aspect which you should consider is if it affects the performance of your phone as well as its storage.
Let’s take a look at the two recorders mentioned above and see the differences and similarities.
Comparisons between three recorders
The iOS 11 screen recording feature, ApowerREC and Apowersoft iPhone/iPad Recorder offer iOS users the ability to record their screen. In terms of similarities, these three secure that they will capture video on HD display. Moreover, they ensure that both the audio coming from the device and microphone can be recorded.
As for differences, there are several that we can list. One, the built-in recorder in iOS 11 does not support other output formats. Likewise, because it is already incorporated within the system, recording for a long time might cause overheating of your iPhone/iPad. Additionally, as your file is directly saved to phone, it might take up the space on your device. You are only allowed to record in Portrait mode.
On the other hand, ApowerREC allows users to directly record their screen activities right from their iOS devices, at the same time providing added useful functions for further enhancement of your video. With this tool you can set the resolution that you want for your video clip by simply hitting the resize function on the preview window. The advantage of this app is that you can capture your screen professionally anywhere you go without a need of any computer.
Meanwhile, Apowersoft iPhone/iPad Recorder gives you the freedom to select the format for your file. Also, it is an external app, thus it has a lesser effect on the device. Moreover, your recorded files are stored on your computer. And it supports recording in portrait and landscape orientation.
According to the above, we can conclude that using a professional tool is much advantageous than relying on iOS 11.
Conclusion
Screen recording on iOS 11 is undeniably a great help to people on different occasions. You can use this when you want to record your gameplay and share it to other video sharing sites. Also, if you need to ask for assistance regarding the problem you’re encountering on your device, you can capture your screen and send the footage to an expert. There are other reasons as to why we need a recorder on our iPhone/iPad. But whatever it is, it’s a must to find an easy-to-use yet efficient tool.

Leave a Comment