You have hundreds of self-shot movies and photos. And with ApowerEdit, you can create your own Hollywood-Style movies with stunning cinema-quality. Whatever skill levels you are, it’s never been easier to make great videos. Choose your own video clips, touch up it with titles, texts, filters, overlays, effects and templates. Your video will come alive. Check out the manual to have a better idea about it.
If you prefer to watch complete video tutorials, then you can go to ApowerEdit YouTube Channel. You’ll quickly get all the tips and tricks about how to use this video editor.
A Full Guide to Use ApowerEdit

Get Started
Register and Activation
For fully utilizing the functions of this video editor, you need an activation code to remove all limits. After you make the purchase of activation code, the license information will be sent to your mailbox immediately. Click the person icon in the upper right corner and the following screen will be displayed.
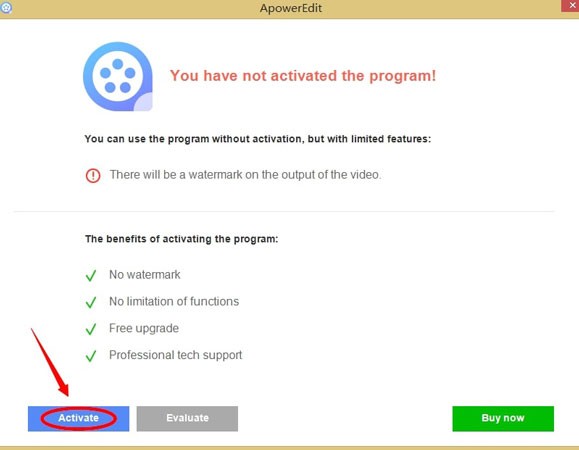
Click “Activate”, paste the activation code from the email into the input box, and click “OK” to complete the software activation.

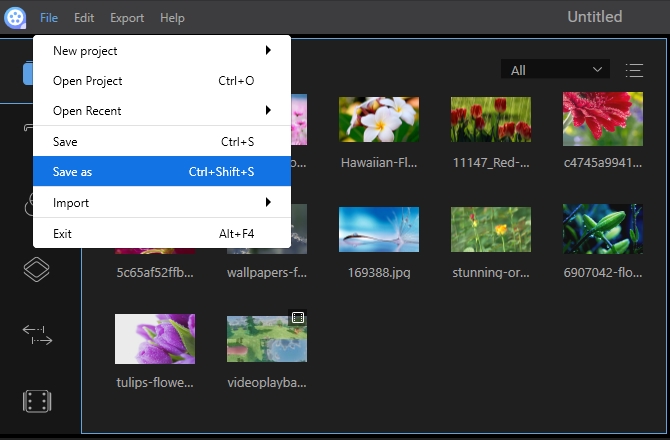
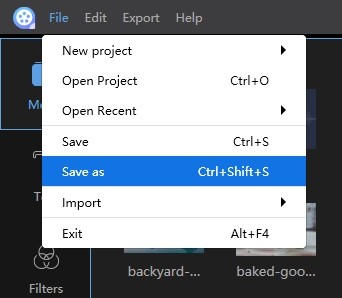
Notes: If you have edited a video before purchasing the program, please click “File” > “Save as” on the top left to save your project file in .ve format after purchasing it. After that, exit the program and then reopen your project file. The program will be activated automatically and there is no watermark in the exported file.
Settings and Configuration
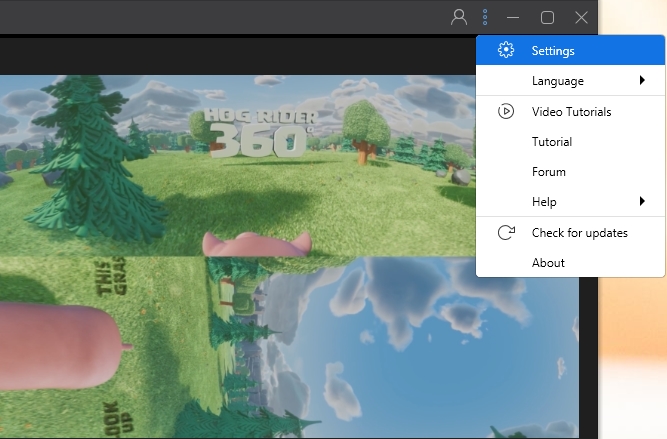
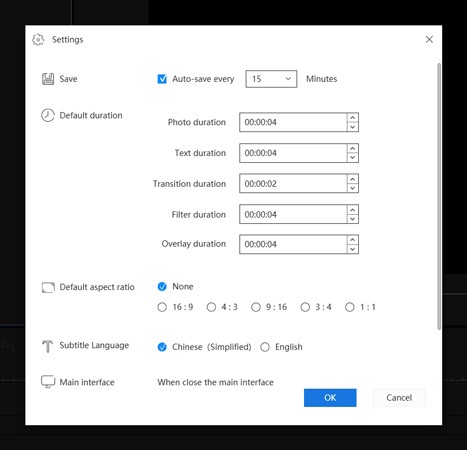
Before you start your editing job, it’s highly recommended to configure the default settings according to your preferences. Click “Settings” on top right corner of the interface, from there, you can:
- Change the performance settings. You can set performances for the time to automatically save projects, the default file duration, the default aspect ratio, the default language for Speech & Text Converter, the status to close the main interface and, etc.
![Main settings]()
- Select the language based on your countries. There are 20 languages available.
- Click “Video Tutorials” to watch video guides.
- Go to forum to exchange editing experience with other customers.
- Update your software to the latest version if there is a new version released.
- Know the details of the software, for example, the current version, etc.
Feedback and Logs
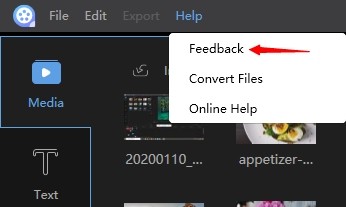
Some accidental issues might happen when you are editing. If this happens, you need to send us the software logs to help the technician figure out the problem. Click “Help” > “Feedback” and you can submit the log file to our ticket system.
Navigating ApowerEdit Interface
Teaching Guide
If you install and run the program for the first time, you can learn how to use the basic editing functions step by step via the prompts.
Five Editing Modes
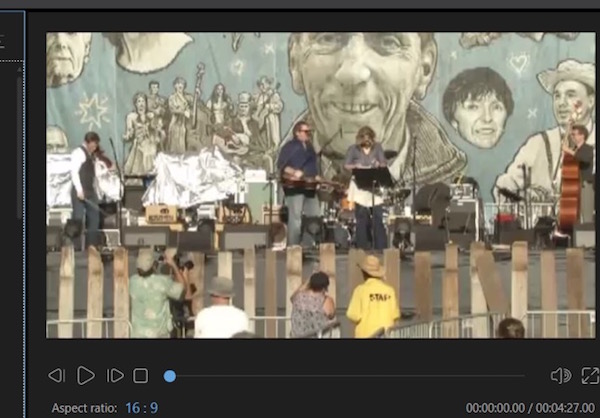
Open ApowerEdit, you’ll see there are 4:3 and 16:9 modes for your choice. Select the correct mode based on your original video aspect ratio or the websites that your video will be uploaded to.

On the top right corner, click the Folder icon and you can open the project you have modified before.
Full Feature Introduction
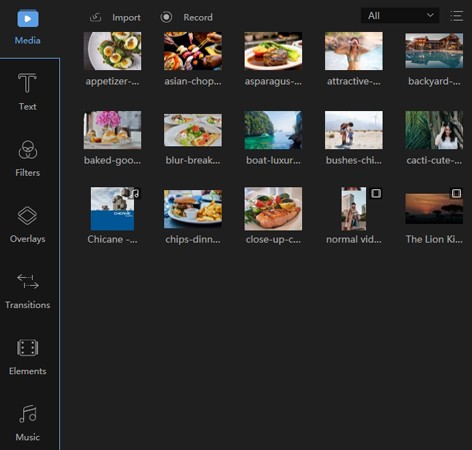
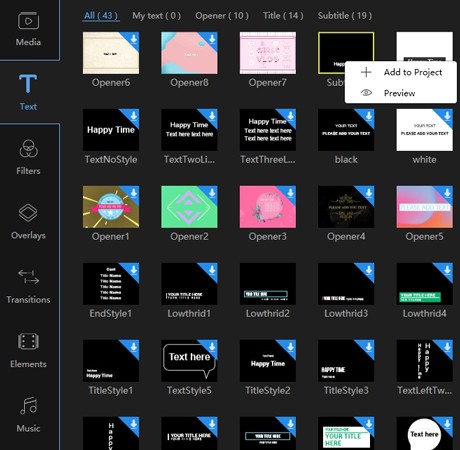
Media/Text/Filters/Overlays/Transitions/Elements/Music: There are seven tabs in this section. You can import the media that you are going to edit, apply texts/filters/overlays/transitions/elements/music to the video clips.
Real-time Preview Window: The player will let you play the media you add inside the software. This will allow you to preview the videos before, during and when finished so you can make sure your movie looks great from beginning to end.
Toolbar: The toolbar offers direct access to some editing commands.
- Undo: Click the “Undo” button to cancel the last edit you made to the media file.
- Redo: Click the “Redo” button to restore the last edit you made to the media file.
- Edit: Click the “Edit” button to edit the video clip including the video playback speed, rotation, flipping and visual effects and the audio/music like volume, fade in/out effect, etc.
- Split: Click the “Split” button to cut the whole video/audio clip into parts.
- Delete: Click the “Delete” button to delete the video clips, filters, overlays, pictures, texts, and the music, etc.
- Crop: Click the “Crop” button to crop the video screen size.
- Mosaic: Click the “Mosaic” button to add a mosaic to the video.
- Freeze Frame: Click the “Freeze Frame” button to freeze the frame and extend its duration.
- Set Duration: Click the “Set Duration” button to set the start and end time to an effect.
- Export: Click the “Export” button to export the media file you edit/create.
- Zoom to fit the timeline: Click the “Zoom to fit the timeline” button to fit the entire contents of the sequence into the timeline size.
- Zoom out: Click the “Zoom out” button to decrease the length of the entire contents of the sequence in the timeline.
- Zoom in: Click the “Zoom in” button to increase the length of the entire contents of the sequence in the timeline.
- Voiceover: Click the “Record Voiceover” button to add a custom voice to the video. The recording will be added while the footage being previewed.
- Speech-to-Text & Text-to-Speech: Select the text to convert it to the natural voice by clicking the converter button. Convert the audio to the text by clicking the converter button, and the subtitles would be automatically allocated to the timeline.
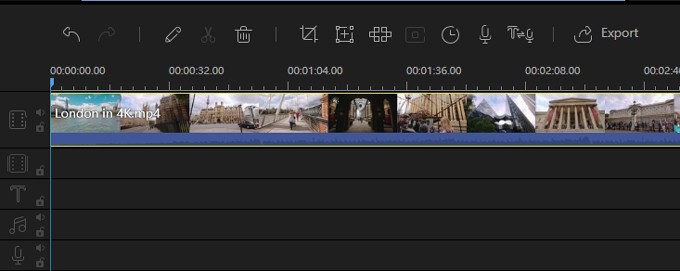
Timeline: The timeline is the place where you can edit the media files.
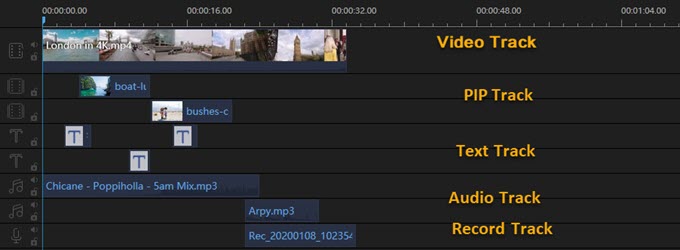
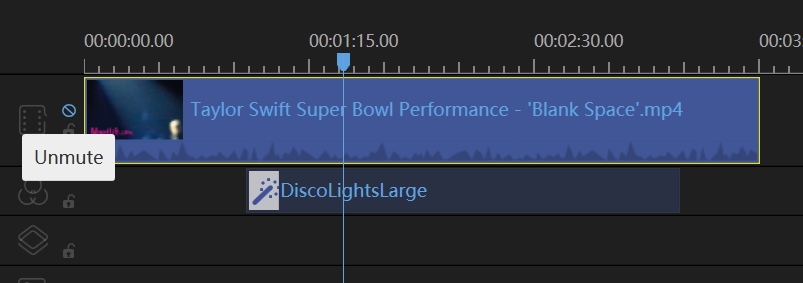
- Video Track: This track is for editing video(s),image(s) and element(s). Click the “Lock” button and the sequence will no longer be editable. Click “Mute” and the soundtrack of the entire video will be muted.Different from the PIP track, this track does not allow the empty space.
- PIP Track: This track is for editing video(s),image(s) and element(s). Click the “Lock” button and the sequence will no longer be editable. Click “Mute” and the soundtrack of the entire video will be muted.Different from the first video track, the editing functions of this track are less than that of the video track.
- Filter Track: This track is for editing filter(s) only. Click the “Lock” button and the filter(s) in the timeline can’t be edited.
- Overlay Track: This track is for editing overlay(s) only. Click the “Lock” button and the overlay(s) in the timeline can’t be edited.
- Text Track: This track is for editing text(s) only. Click the “Lock” button and the text(s) in the timeline can’t be edited.
- Audio Track: This track is for editing audio(s) only. Click the “Lock” button and the audio(s) in the timeline can’t be edited. Click “Mute” to mute the sound.
- Voiceover Recording Track: this track can only be used to edit the recorded audio file. The audio file can’t be edited if clicking the “Lock” button and it will be in mute if clicking the “Mute” button.
Tips: Except for the first video track and the voiceover recording track, all tracks support another branch.
Import media file(s)
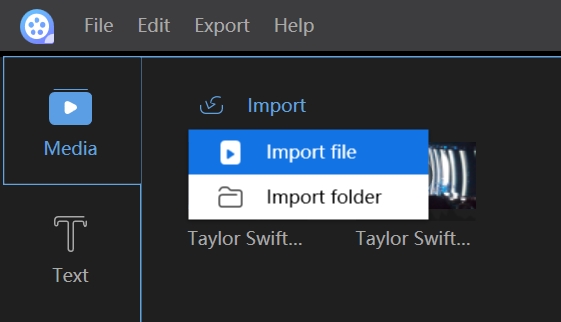
Import file(s)
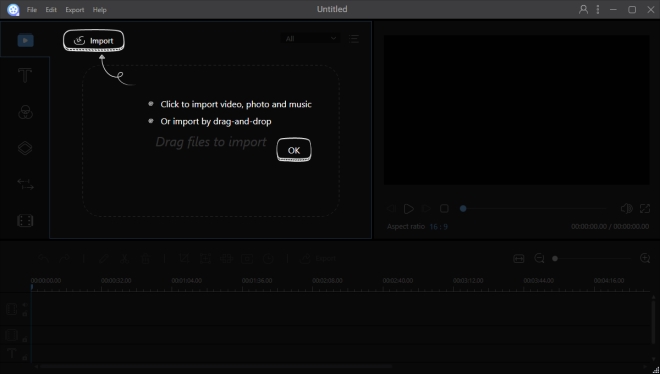
Three kinds of files are supported in this software: audio, video and image. You can directly drag the file folder or files to the media zone for editing. Or you can import them manually by clicking the “Import” button on top left corner. Organise them by name, duration, type and date imported if you need it.
Delete file(s)
In the Media Library, right click the clip and select “Delete” to remove the file that you imported just now. Note that the file has just been deleted from the software. The actual file still remains in its original location.
Context Menu
When the file is imported into the Media Library, right click it and you’ll find many useful functions there.
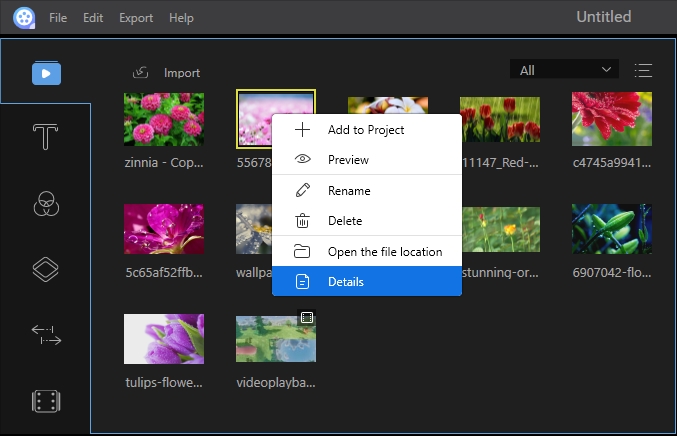
- “Add to project” to add the file to the timeline.
- “Preview” to view the file in the built-in media player.
- “Rename” to create a new name for the file.
- “Open File Location” to check concrete location of the added files.
- “Details” to check detailed information of the loaded files.
Basic Editing
Edit video clip(s)
Create a Video Sequence
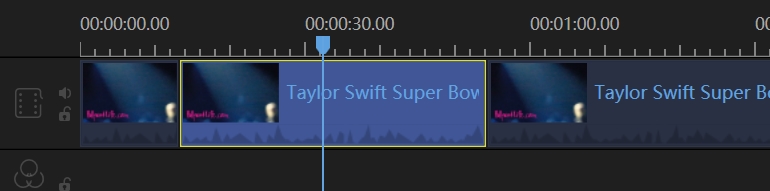
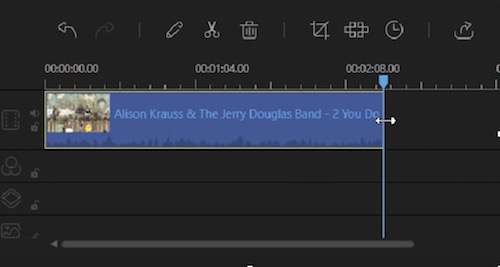
Add video clips to the timeline panel by dragging and dropping from the Media Library. You can also right click the clips in the “Media” and choose “Add to Project” to load them to the timeline. For combining several video clips together, load all of them to the timeline. Left click the file, hold the mouse and move the file forward or backward to adjust the order.
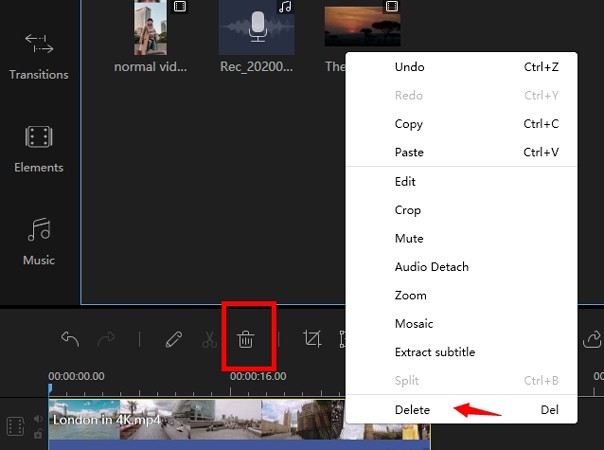
Delete Video Clip(s) from the Timeline
Select the unwanted part and click the “Delete” button in the Toolbar to delete it. You can also right click the unwanted one and choose “Delete” to get rid of the part from the timeline.
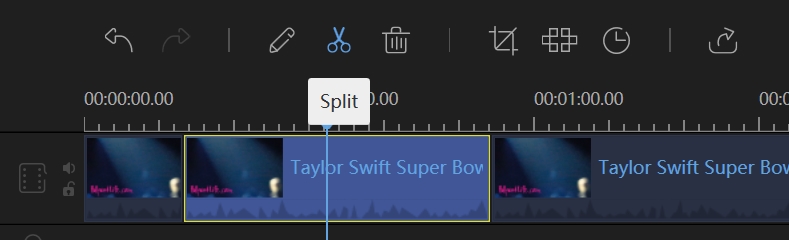
Split Video Clip(s)
Choose the file in the timeline, move the playhead to where you want to cut, click the “Split” button in the Toolbar or you can right click the file then choose “Split” from the context menu instead to split the long movie into parts.
Trim Video Clip(s)
Move the mouse over the edge of the video displayed in the timeline until you see a double arrow.
Press and hold the left mouse button and move the mouse left/right to trim your desired/undesired part.
Note: If you want to trim a part in the middle of the clip, you have to split it first.
Speed/Rotate/Enhance Video Clip(s)
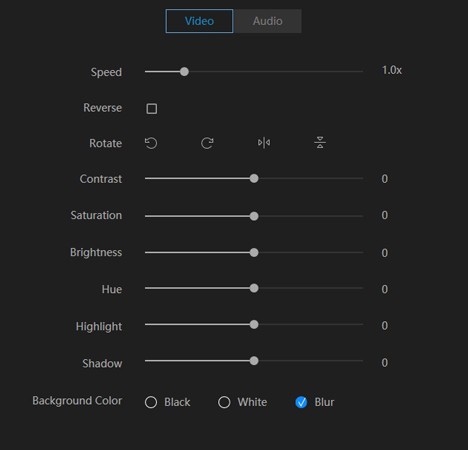
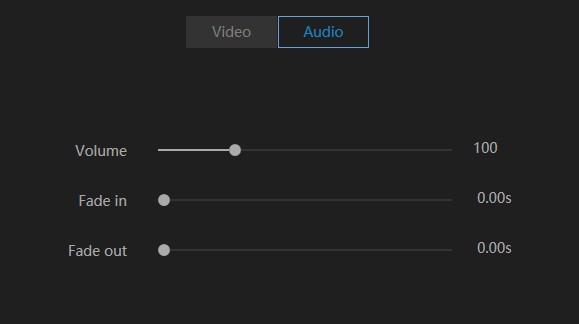
Select the video in the timeline and click the “Edit” icon on the toolbar to edit the video speed, make the video in reverse, rotate the video and adjust the contrast, saturation, brightness, highlight, shadow or background color. You can click “Audio” next to “Video” to adjust the audio volume and add fade-in/out effects.
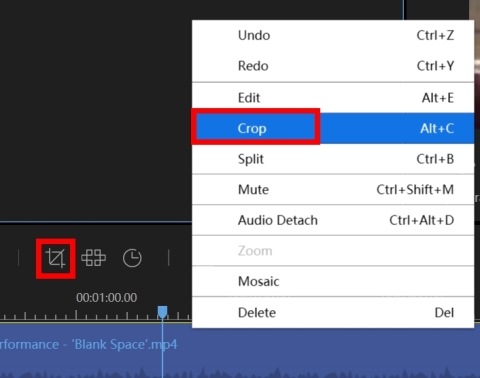
Crop Video Clip(s)
Select the clip in the timeline, click the “Crop” button in the Toolbar to change the screen size of the video or right click the clip, choose “Crop” from the context menu instead.
Note: Enable “Keep aspect ratio”, the crop window will change at its original aspect ratio.
Add Mosaic to Video Clip(s)
Add Mosaic(s) – Choose a video clip and click “Mosaic” button in the Toolbar. Or right click the clip, choose “Mosaic” from the context menu instead. After that, click “Add” and a yellow rectangle will appear onscreen in the left window. Move the yellow rectangle to the place you want to blur. Drag the edge of the screen to adjust the mosaic size. You can preview the real-time effect in the right player window.
Delete Mosaic – Click “Delete” to take out the mosaic. Or click “Cancel” to stop the changes.
Note: The mosaic will appear from the beginning to the end of the video.

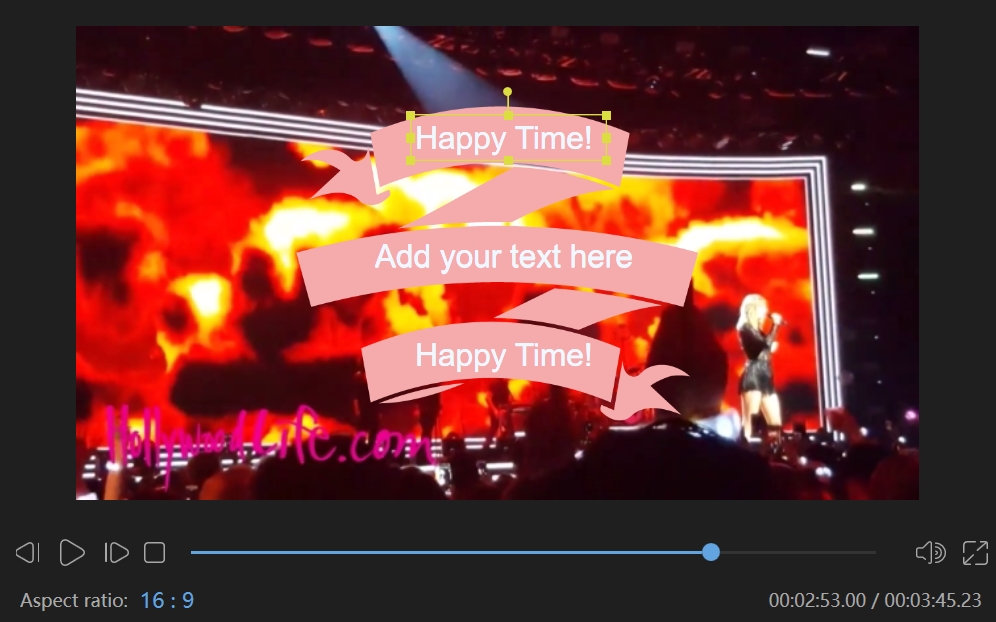
Add Text to Video Clip(s)
Choose the Text style you want to use, drag it to the Text track in the timeline or you can right click the Text style and “Add to Project” to apply the feature to your video as well.
Then select the Text in the timeline, move the mouse over the edge of the Text until a double arrow appears. Press and hold the left mouse button and move the mouse left/right to set the beginning/end time of the text or you can directly select the Text in the track and then click “Set duration” in “Toolbar” instead.
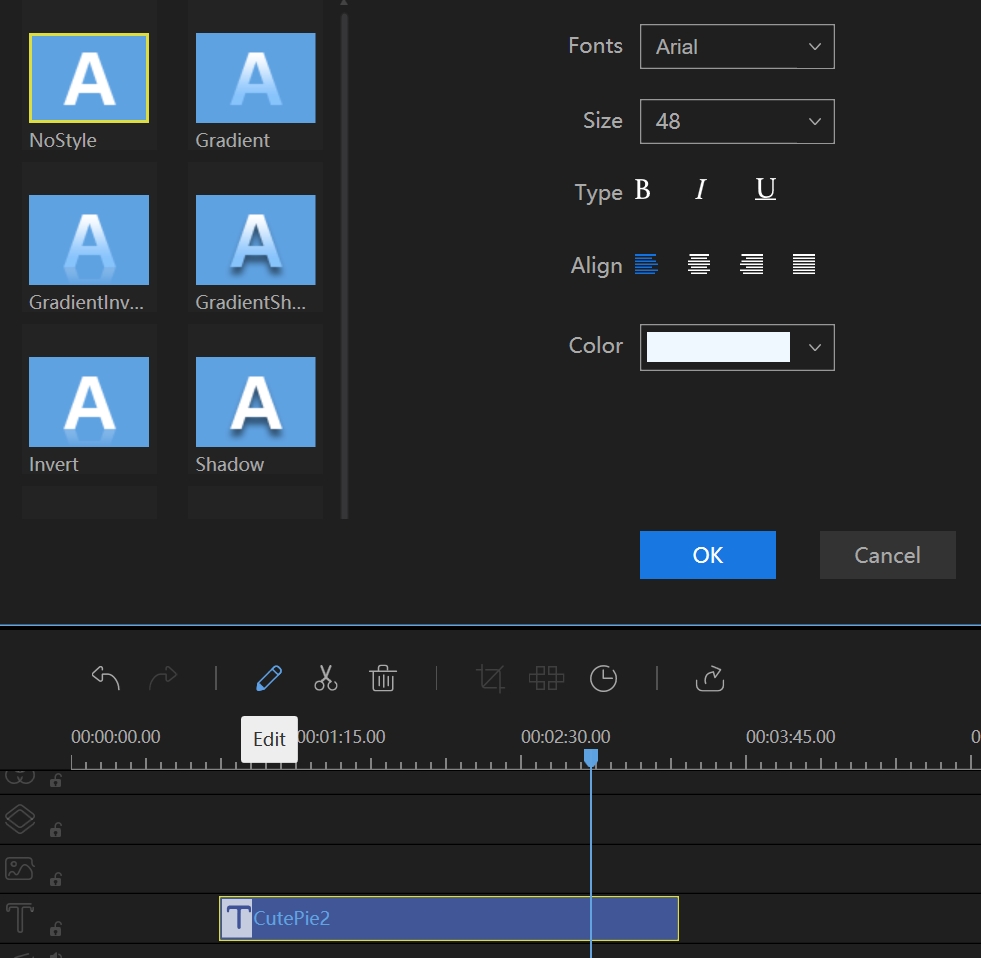
Double click the Text in the track or right click it, choose “Edit” from the context menu instead, in the real-time Preview window, you can edit the words, position and in the left edit window, you can set the style, motion, font, size, type, and color for the texts.
Click “OK” to make the changes work. Click “Cancel” to stop the changes.
Note: Repeat these steps if you want to add multiple texts to different parts of the video.
Add Filter to Video Clip(s)
Choose the Filter style you want to use, drag it to the Filter track in the timeline. Or you can right click the Filter style and “Add to Project” to apply the feature to your video as well.
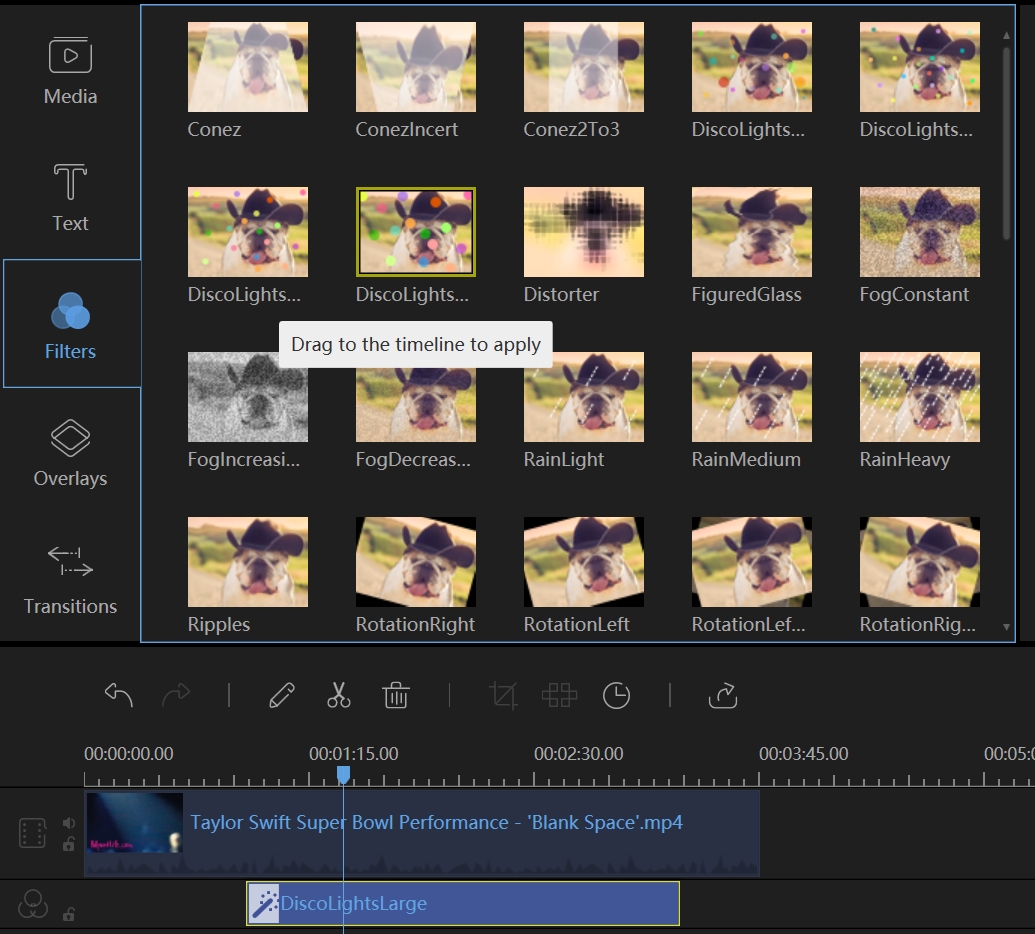
Then select the Filter in the timeline, move the mouse over the edge of the Filter until a double arrow shows there. Press and hold the left mouse button and move the mouse left/right to set the beginning/end time of the filter. You can directly select the Filter in the track and then click “Set duration” in “Toolbar” instead.
Double click the Filter in the track or right-click it, choose “Edit” from the context menu to edit the parameters available.
Click “OK” to make the changes work with your video.
Note: Repeat these steps if you want to add multiple filters to different parts of the video.
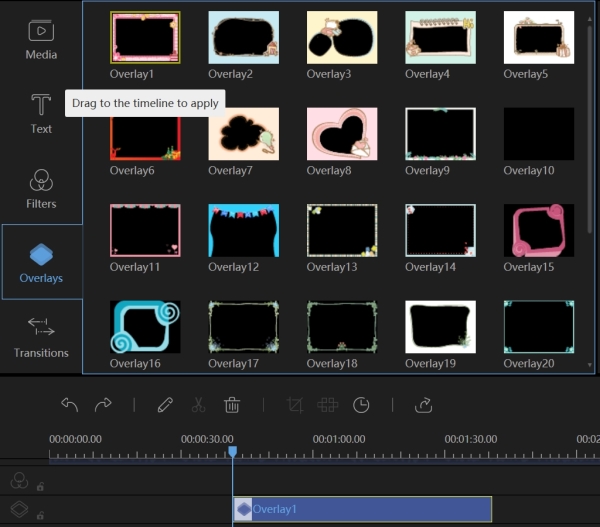
Add Overlay to Video Clip(s)
Choose the overlay style you want to use, drag it to the overlay track in the timeline. Or you can right-click the Overlay style and “+ Add to Project” to apply the feature to your video as well.
Then select the overlay in the timeline, move the mouse over the edge of the overlay until a double arrow shows there. Press and hold the left mouse button and move the mouse left/right to set the beginning/end time of the Overlay. You can directly select the overlay in the track and then click “Set duration” in “Toolbar” instead.
Double click the overlay in the track or right-click it, choose “Edit” from the context menu to edit the available parameters.
Click “OK” to make the changes work with your video.
Note: Repeat these steps if you want to add multiple overlays to different parts of the video.
Add Transition to Video Clip(s)
Choose the Transition style you want to use, drag it to the end of the video that will transit to another video or you can right-click the style and select “+ Add to Project” instead to apply the transition effect. If you need to add different transition effects to video, you may choose “Apply random transitions”. To apply the same transition effect, please select the transition template you like and click “Apply to all”.
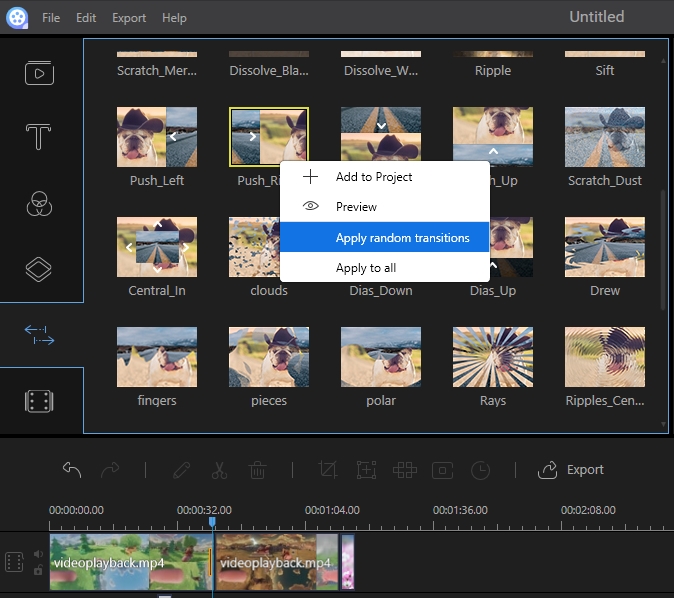
Note: Repeat these steps if you want to add the transition effect(s) to different parts of the video.
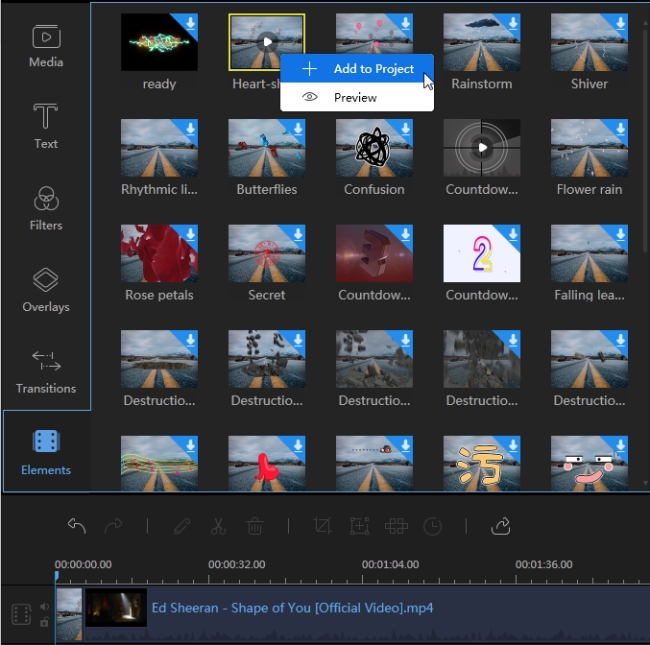
Add Element to Video Clip(s)
Choose the Element style you want to use, click the “Download” button to download it. Or you can also right-click the element and in the context menu: “Download this element” to download the one you selected; “Download All” to download all elements this software offers. To preview the downloaded element, double click on it, or you can also right-click on it and “Preview” to play the element in the player.
After that, you can apply the available element(s) to the project. You can drag it to the timeline. Usually, if you put the element in the Video track, it will be used as an interesting opening or ending of the video. While if you put the element in the PIP track, it will be used as an animation effect.
To set the duration for the element, select the element in the timeline, move the mouse over the edge of the element until an arrow shows there. Press and hold the left mouse button and move the mouse left/right to set the beginning/end time of the element. You can also directly select the element and then click “Set duration” in “Toolbar” instead.
Double click the element in the track or you can also right-click it, choose “Edit” from the context menu to edit the parameters available.
Click “OK” to make the changes work with your video.
Note: You can also split, crop, zoom and mosaic the element.
Add Watermark(s)/Logo(s) to Video Clip(s)
Click “Import” in the top left corner in “Media” to add images or watermark(s) to the software, right click it, choose “Add to Project”, and the image will be inserted into the video clip. If you want to use the image as a watermark/logo, you can directly drag it to the Image track. Double click it to edit its motion and mask. In the right Preview window, you can directly adjust its position and size on the video. To edit its duration, select the image in the timeline, move the mouse over the edge until a double arrow appears, drag it left/right to set the start and end time.

Replace Original Video Sound
Click the “Mute” button on the video track to remove the original video sound first. Drag and drop the imported audio file in the Media Library to the audio timeline. Select the audio file and double click it to bring out the window for editing audio where you can adjust the audio speed, increase/decrease the volume and set the fade in/out effect.
Edit Audio Clip(s)
Add Background Music to Video
Newly built-in music library is added for adding background music to a video. Click the music icon in the sidebar to apply music from the resources, wherein you can find various music and audio effects. You can have a listen by double-clicking it. To add the music to the video, download it from the cloud and click the “plus” icon to put it to the timeline.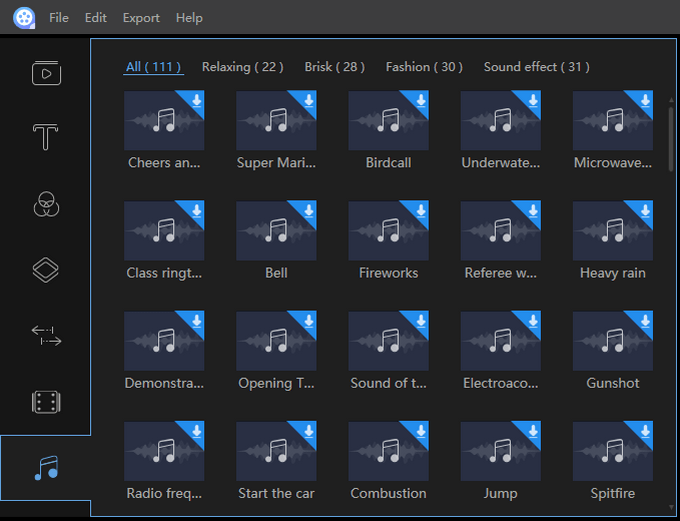
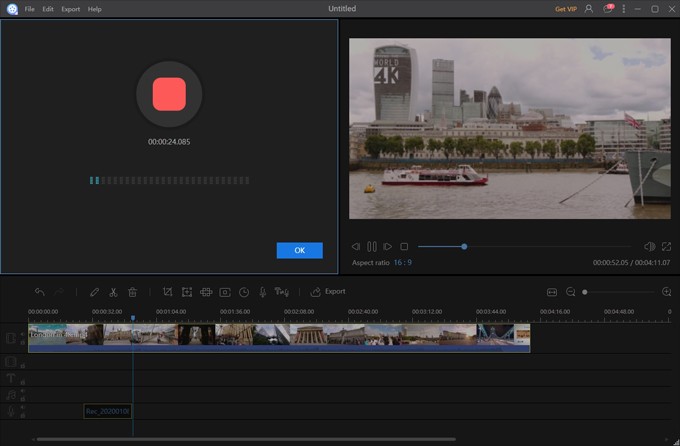
Dub the Video
The voiceover recording function is available on the toolbar. After you installed and adjusted your microphone device, the recording button on the toolbar will light up. You can click it to record your voice. The voice you recorded will be synchronized and played automatically in the preview area. You can double-click the recorded file on the voiceover track to adjust the audio speed and volume or add the fade-in/out effects.
Create Audio Sequence
Add audio clips to the audio track through a drag-and-drop from the Media Library. You can also right-click the audio clips in the “Media” and choose “Add to Project” to load them to the timeline for audio. They will combine several audio clips together and load all of them to the timeline. Select the file, hold the mouse and move the file forward or backward to adjust its order.

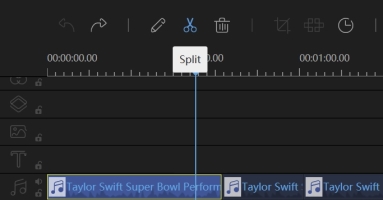
Split Audio Clip(s)
Choose the audio file in the timeline, move the playhead to where you want to cut, click the “Split” button in the Toolbar or you can right click the file then choose “Split” from the context menu instead to split the audio clip into parts.
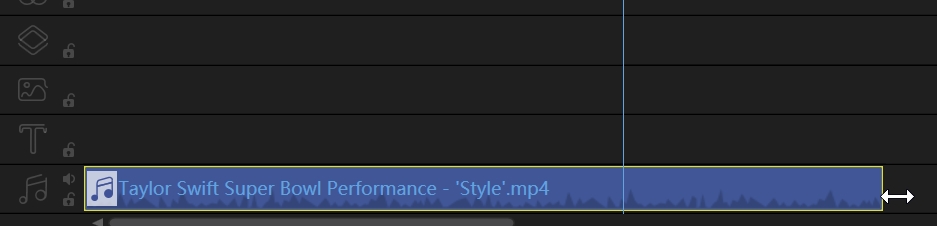
Trim Audio Clip(s)
Move the mouse over the edge of the audio displayed in the timeline until a double arrow appears there.
Press and hold the left mouse button and move the mouse left/right to save your desired part from the whole file.
Note: If you want to trim a part in the middle of the audio clip, you have to split it at first.
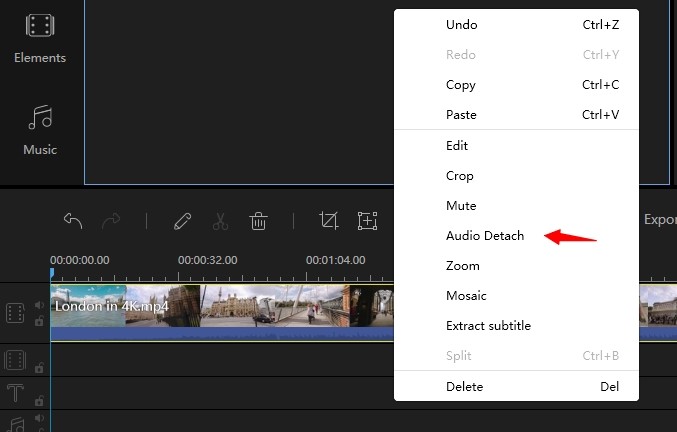
Detach Audio from Video
Right click the video clip in the video track, choose “Audio Detach” from the context menu. The audio clip you just detached will show in the audio track immediately. The original video clip is well kept.
Speed up/Slow down Audio
Double click the audio clip in the track to bring out the window in which you can adjust the playback speed of the audio clip. You can also right click the audio clip and choose “Edit” from the listing to adjust the speed.

Adjust Audio Volume
Double click the audio clip placed in the track. The window in which you can increase/decrease the audio volume will pop up immediately. You can also right click the audio clip and choose “Edit” from the listing to bring out the editing window.
Audio Fade in/out Effect
Double click the audio clip in the track to bring out the window where you can adjust the second(s) for applying a fade in/out effect. You can also right click the audio clip and choose “Edit” from the listing to make the settings.
Editing Image(s)
Add Image(s) to Video Track
Move the playhead to where you want to add an image, right click the image that has been imported to the Media Library, choose “Add to Project” to load it to the video track. If you wish you can also directly drag and drop it to the video track. To add the image to the middle part of the video, split the video clip first.

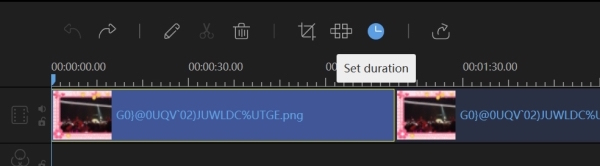
Set Image(s) Duration
When the image is added to the video track, the default duration for displaying the image is 4 seconds. Choose the image, and click “Set Duration” in the Toolbar to change the duration.
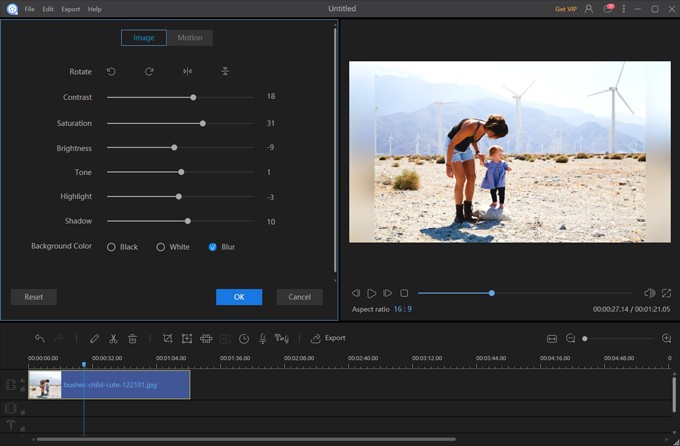
Adjust Image(s) Contrast/Saturation/Brightness/Tone/Highlight/Shadow/Background color
Right-click the picture on the track and choose “Edit” on the pop-up menu or select the picture and click “Edit” on the toolbar to adjust the visual effects, including the contrast, saturation, brightness, tone, highlight, and shadow. Besides, you can set the background color to make the picture look natural when its aspect ratio is inconsistent.
Rotate Image(s)
Right hit the image in the video track, select “Edit” from it or you can select the image and click “Edit” button in Toolbar to bring out the editing window in which you can rotate and flip the image.
Apply Image(s) Motion
Right click the image in the video track, choose “Edit” from the context menu or you can select the image and click “Edit” button in Toolbar to bring out the editing window. Under “Motion” tab, you can apply the style for the image(s).
Export Project(s)
Click “Export” in the Toolbar to export the project. There are four available ways to save the project.
Export as a Project File
Save the file as a project file if you think it needs further editing. The next time you want to adjust it, you can directly open it in the software to edit it again. Note that the project file is not a real media file.
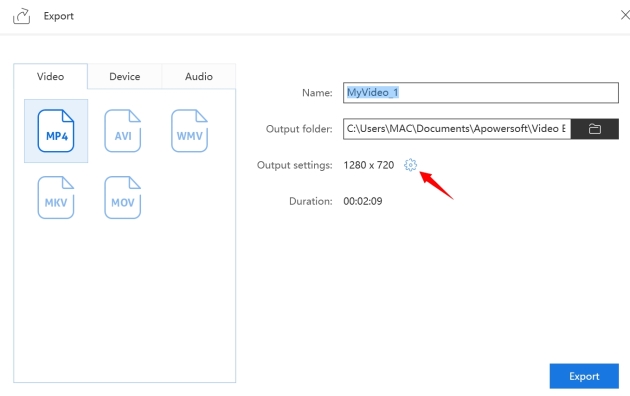
Export as a Video File
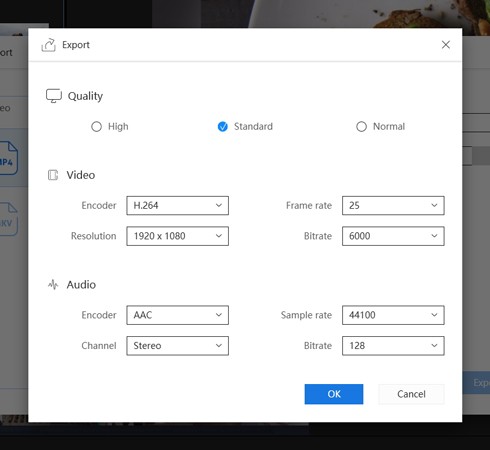
This software supports five available video formats to export the project file into: MP4, AVI, WMV, MKV and MOV. After you have set the preferred format, you can rename the file, choose the output folder, and configure the parameters of the file, for example, quality, video codec, bitrate, framerate, etc. When all are well set, click “Export” in the lower right corner to save the file in your computer.
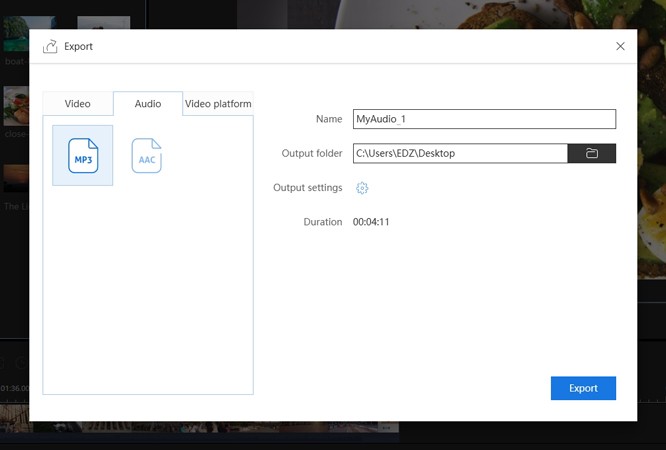
Export as an Audio File
Under the “Audio” tab, there are MP3 and AAC format to export your file to. As well, you can edit the quality and its parameters.
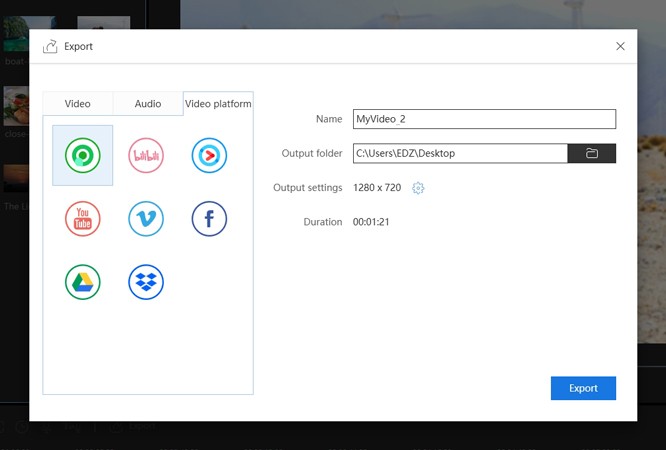
Export to Video Platform(s)
With the“Video platform” option, you can choose to share the video to RecCloud, BiliBili, YOUKU, YouTube, Vimeo, Facebook, Google Drive, or Dropbox after the video is exported.
Leave a Comment