ApowerREC is a very intuitive and robust screen recording tool which allows you to record all activities displaying on your computer with HD quality. It offers you multiple recording modes including full screen, custom area, fixed region and around mouse. You can use it to record video along with audio, annotate video in real time, record video from webcam and so on.
Moreover, it can help you do task recording by scheduling task or following application. To let you know about its Task functions quickly, here we are going to show you ApowerREC task recording FAQ.
Guide to create task recording via ApowerREC
How to use Task Scheduler
In case that you don’t have time to stay in front of your computer for attending an online meeting, watching a live streaming video, joining live video chat, etc, you may use the Task Scheduler function to record the videos automatically.
The specific steps of taking scheduling task:
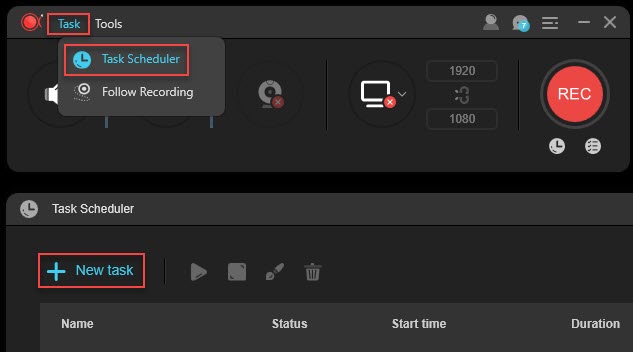
- Click on “Task” > “Task Scheduler” > “+ New Task”.
- Start time: Set the start time by left-clicking the numbers of year-month-day hour: minute: second, and then adjust them by typing new numbers directly or scrolling mouse wheel forward/backward. If you need to repeat recording, click on the “Repeat” icon and then check “Repeat”. Left click “Monday, Tuesday, Wednesday, Thursday, Friday, Saturday, or Sunday” to select one day or any days, click “√” to deselect.
![Set start time]()
- Duration/Stop time: You can choose to set either duration or stop time for ending your task. Set duration by typing the numbers of hour: minute: second. Click on “Loop” and check “Loop” option, afterwards, select “Stop recording manually” or input the repeat times such as 5, 10, etc. Also, follow the method about setting start time to set the stop time.
![Set duration]()
- Recording area: Click on the drop-down menu and select recording area as full screen, custom or none. Once you select “Custom”, you will see a blue cross instantly. Drag the cross to set the recording area. Click on the red “x” on the toolbar if you need to reset it.
![Choose recording area]()
- Audio input: select the audio input as None, System sound, Microphone, or System sound and microphone.
![Choose audio input]()
- Webcam: If you need to record from webcam, please remember to plug it in your computer before launching ApowerREC. Select the webcam you intend to record.
![Select webcam]()
- Recording completed: Choose to do nothing or shut down after recording.
![Actions when recording finished]()
- Name: Type your new task name or remain the default one.
![Type name]()
- When all settings are done well, click on “OK”.


Now you have created a scheduling task successfully. ApowerREC will perform the task as you have already scheduled. The task will appear on the main interface of Task Scheduler. You can choose to delete/stop/edit the enabled task before the task starts.
Tips: Please make sure that you have launched both your computer and ApowerREC before the scheduled time. Otherwise, the program doesn’t have the ability to perform your scheduled task.
How to do Following Recording
If you need to keep track of the application running on your computer, you may use Follow recording feature of ApowerREC. It will be very helpful when you need to make an instruction of application, report bugs of application, give presentation via application and so on. Without stopping the recording manually, ApowerREC has the ability to auto-end the task smartly as soon as you exit the following application.
The process of making following recording task:
- Open the application that you need to record. Click on “Task” > “Follow recording”. Check “Enable Follow Recording”.
![Enable follow recording]()
- Follow the application: Select the application you need to follow in the drop-down menu of “Follow the application”. The applications will appear in the drop-down list only if you have already opened them on your computer. Click on the “Refresh” if you couldn’t find the application you ran in the list.
![Select following application]()
- Recording area: Set the recording area as full screen or customize region by dragging the blue cross on the application you need to follow. If you intend to record only audio, please choose the recording area as none.
![Set recording area]()
- Audio input: Choose the audio source as None, System sound, Microphone, System sound and microphone.
![Select audio input]()
- Webcam: If you need to record from webcam, select the webcam which you have plugged in your computer. If you don’t need to do it, you may choose none.
![Choose webcam or none]()
- ApowerREC will start to follow recording the application as soon as you click on “OK”. The recording task will stop automatically when you exit the application. Also, you can click on the red “Stop” button to end the recording.


Leave a Comment