iPhone is well known for its clear and high quality camera, and that is why iOS users are so fond of taking pictures and recording videos with their phone. However, recording a video on iPhone can take up so much space because its file size is very large. For this reason, it will also take you lots of time when you intend to upload or share your video. Lucky for you, here we have listed some of the great tools which can help you compress a video on iPhone. Check them out below to resize your iPhone videos instantly.
How to compress video on iPhone
BeeCut
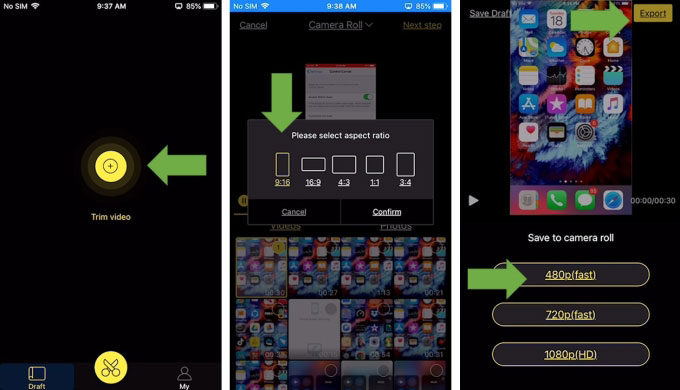
The first tool on our list that you can use to solve the problem of how to resize a video on iPhone is called BeeCut. This amazing tool is actually a video maker and editor, which also offers its own resizing function. Using this function, you can adjust your video file size or even its aspect ratio. Moreover, it also offers many other cool video editing features including reversing, speeding, rotating, splitting, adding text, music, filters, adjusting volume, etc. Try this wonderful tool by following the simple steps listed below.
- Go to the App Store and download the application for free.
- Open the application and upload your video by tapping the “+” sign button.
![compress video on iPhone]()
- Once the video is uploaded, select your desired aspect ratio. Click the “Export” button and choose your preferred resolution. If you want to output a video with a smaller size, we would recommend you to select 480p.
Videoshop
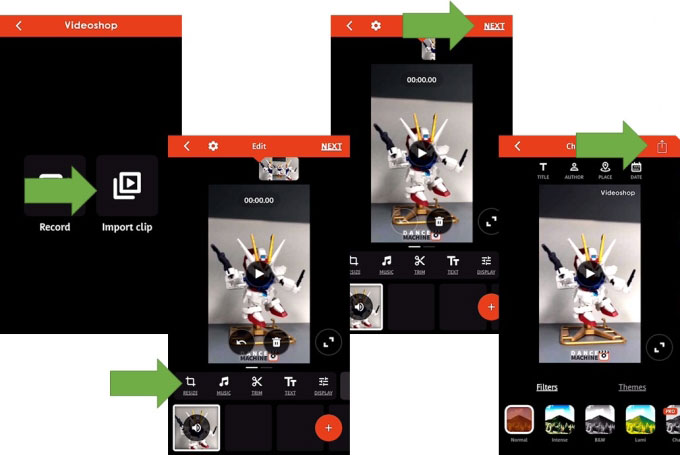
Another video compressor for iPhone is called Videoshop. This app is available on both Android and iOS devices. This tool allows you to add music and sound effects, adjust display, add text, voiceovers, transitions, play videos in reverse, and compress and resize your video. Moreover, after editing your video, you can share it onto the popular social media sites like Facebook, Twitter, Instagram and many more. Undoubtedly, this is an easy to use video compressor for your iPhone. To resize your video using this app, check out the procedure below.
- Download the application on your iPhone from the App Store.
- Launch the application and tap the “Import clip” icon to upload your video.
![Videoshop]()
- Select the “RESIZE” icon at the lower left corner of the screen, then choose your preferred size from the given options. Once done, tap on “NEXT” at the upper right corner of the screen.
- Afterwards, tap the “Share” icon on the same spot to save your video on your PC or just select the site where you want to upload it directly.
Video Compress
For the last video compressor for iOS on our list, we have Video Compress. This tool offers a simple and clean interface. Moreover, after compressing your videos, you can also upload them directly onto your social media accounts like Facebook and Instagram or send them straight to your friends or contacts via WhatsApp and iMessage. Check the procedure below to shrink the size of your videos.
- Download the application on the App Store and then launch it.
- Tap the big “+” icon and select the video that you want to resize.
![Video Compress]()
- Once the video is uploaded, tap the “Choose Preset” button to select your desired file size.
- After that, click “CONTINUE” to save the video. Or send and upload it directly onto one of the social media sites.
Conclusion
Well, now you can compress video on iPhone super easily with the three apps shared above. Moreover, it won’t take you so much time to send or share your video. If you also need to enhance your recorded video quality before compression, it is advisable to use BeeCut or Videoshop. Both of them come with a number of practical video editing functions. Just try the last app if you only want an easy to use video compressor.


Leave a Comment