In our daily life, we sometimes need to take a record for webpage content, such as an announcement from an official website. Also, for some users, they need to record a presentation or other activities happening on the web browser and share with others. However, it is still not easy for some people to record web browser on iOS. Hence, today we will share with you 3 apps which can help you record your web content.
3 Ways to Record Webpage for iOS
ApowerREC – Record and Do Real-time Editing
ApowerREC is a multi-platform tool which can work for screen recording on your Windows, Mac and iOS. And its iOS version can record the activity inside this app. Once you open this app, you will find that it looks like a web browser, but different from the Safari, there are recording and editing tools at the bottom. Thus, you can browse the website in the app and record the content. Below is the step-by-step guide on how to record web browser on iOS.
- Install the app from App Store.
- Open the app and go to the website you want to record.
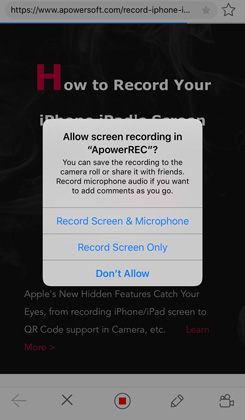
- Hit the red icon. You will see a window popping up asking you whether record screen or microphone, choose one of the first two options according to your need.
![ApowerREC Prompt]()
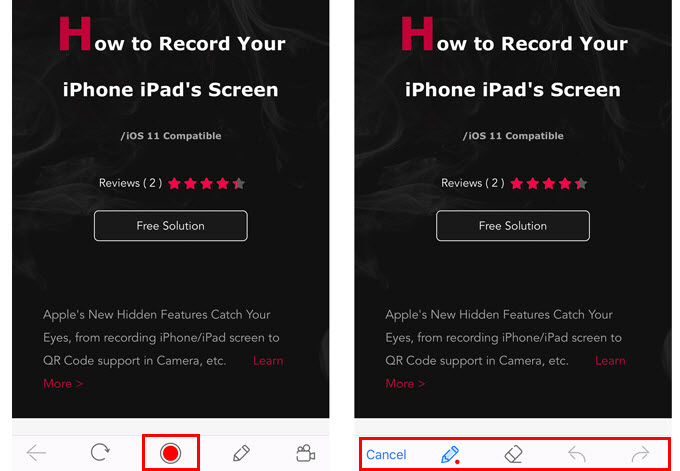
- While recording, you can hit the pencil icon to do the real-time editing. Once finish editing, tap “Cancel”. And hit the red stop icon when you want to end the recording.
![Record and Edit]()
Advantages:
- The app is clean and has no ads.
- It allows real-time editing, which can be used in presentations for better understanding.
Disadvantages:
- The app is only available for iOS 11 or later.
Record it! – Record and Edit the Video after Recording
Record it! can record almost everything on your devices running iOS 11 or later, so it can also record safari. And if you want to edit your recordings before sharing them, then this app can be a nice choice. Now let’s start recording with the following instructions:
- Download the app on your iOS devices.
- On your iPhone, go to “Settings” > “Control Center” > “Customize Controls”. Add “Screen Recording” to “INCLUDE” list.
![Customize Controls]()
- Go to Safari and hit on the page you want to record.
- Open “Control Center”, press the record button for a while, until it shows “Screen Recording” interface. Choose “Record it! Capture”, turn on “Microphone Audio” if you need and hit “Start Broadcast” to begin and hit the red bar at the top to end.


After you record record webpage for iOS, you can go to the app and hit “Trim” to edit your video. And if you want to record webcam and add it to the video, you can tap “React” > hit the button under the video to record your actions. Once done, hit the button again > tap the rightward arrow > press “Finish and Save” to save the recordings.

Advantages:
- It allows trim after recording.
- It can record activities outside the app.
- It can record webcam and combine the webcam recording with the webpage recording, which suits game players who would like to share their gameplay on websites like YouTube.
Disadvantages:
- Only devices running iOS 11 or higher can use the app.
- The app contains a few ads.
Web Recorder – Record Screen Under iOS 11
As its name implies, Web Recorder is an app which mainly works for recording web. Unlike the former apps, this iOS web browser recorder only has one feature – recording. But if you are an iOS device owner whose device is under iOS 11, this may be a nice choice. Here is how to use it.
- Get the app from App Store and open it.
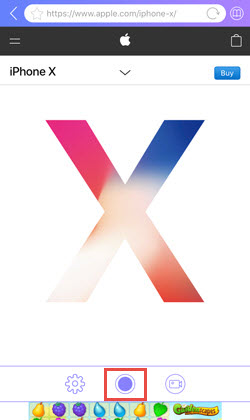
- Type the website link inside the app, once it finishes loading, hit the record button at the bottom to start recording.
![Web Recorder Interface]()
- Tap the stop button again when you want to finish it.
Press the camera icon at the bottom, you can check all your recordings and choose one to play.
Advantages:
- It supports devices with iOS 7.0 or later.
- The recording buttons and the website links will not be recorded, it only records the webpage content.
Disadvantages:
- It has too many ads.
Tip: Transfer the Recordings from iOS Web Browser Recorder to Photos
All the recordings captured by these three apps will be saved inside apps, and will not go to “Photos” app. If you want to save the recordings to your photos, you can do as follow:
- Go to one of the app, tap on the video you want to move to “Photos” app.
- Hit the share button. (On Web Recorder, you can directly tap the video and “Share”)
- After that, you will go to AirDrop, press “Save Video” and you can transfer the video from the app to the “Photos”.

Summary
Now, you’ve known how to record web browser on iOS and you can choose your ideal one according to the pros and cons above. To summarize it, if you want to highlight the content to your video viewers, you can choose ApowerREC, if you want to record webpage as well as webcam, Record it! is your best choice, and if your iPhone or iPad is not updated to iOS 11, you’d better consider Web Recorder.
If you meet any problem while recording web browser or know other excellent iOS web browser recorders, you can leave a comment to tell us.

Leave a Comment