Toshiba is a Japanese tech corporation which manufactures computers equipped with advanced technology, making it competitive with rival brands like HP and Dell. Taking screenshot on a Toshiba PC is essential, since it allows users to collect interesting and important news on webpages, share funny messages and give others instructions of using programs or playing games. However, not everyone knows how to screenshot Toshiba. Even if you know the default print screen function on Windows, you may still wonder how to capture a full webpage, set delay in capture, etc. Therefore, this article will give you an overall guide to this concern.

I. Most Effective Way – Use Powerful Tool
II. Windows Default Way – Use Key Combo
III.Alternative Way – Use Other Programs
I. Use Apowersoft Free Screen Capture
In taking screenshot of your Toshiba PC screen, the best way that you can utilize is by using an outstanding application called Apowersoft Free Screen Capture. This is a free web-based application that enables you to capture anything on your Toshiba PC screen without any hassle. You can capture the full screen, a region and an active window. You can also set a delay in capturing a menu or tooltips. This tool also comes with a basic image editor which lets you edit screenshot the moment you capture it on the screen. You are allowed to save the screenshot on local disk, copy it to clipboard or share it to social networks. Plus it has cloud integration in case you don’t want to keep your image in local folder.
Here are the steps on how to screenshot Toshiba using this tool.
- Go to the page of this application, click the “Launch Application” button and run Java applet to load this tool on your PC.
- Once the tool is loaded, display what you want to capture on the screen, and then click the “Camera” icon on the interface of this tool. You can also use the hotkeys of “PrtSc” or “Ctrl + Q”.
- After that, your mouse cursor will turn into a crosshair. And then, click, hold and drag your mouse to select an area and release the mouse to confirm it.
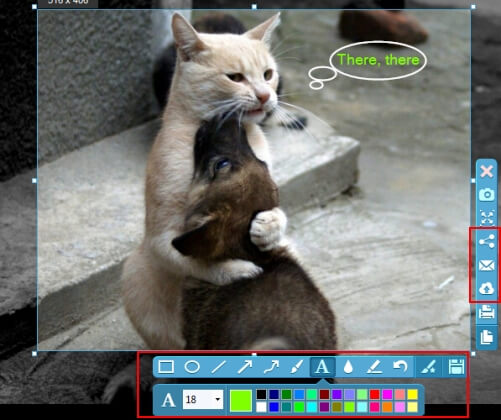
- An editing tool will then appear below the screenshot. From here you can add basic annotations if you wish.
- To save the image in local folder, just click the diskette like icon. Alternatively, you can also choose to upload it to the free cloud space so that you can share your images to blogs and forum with the given links you receive after uploading.
Moreover, this freeware has a pro version that has added more powerful features, including two image editors (Advanced and Quick Editors) and a screen recorder. It also allows you to create schedule tasks for taking screenshot automatically. Check out this app by hitting the download button below.
II. Use Key Combinations
Another way to take screenshot is by using the Windows built-in screenshot function. This method may vary depending on the device’s model and operating system. In Windows 7, the usual way to take screenshot is by pressing the “Print Screen” key, and using Paint to save the screenshot as an image file. While in Windows 8/10, you need to press “Win + Print Screen”, and the screenshot will be saved to the “Screenshots” folder in “Pictures” library.
However, a lot of people still don’t know how to screenshot on Toshiba satellite. On these laptops, the print screen function and another function share the same key. For example, there maybe an “End” on the “PrtSc” key, which means the function of “End” and “PrtSc” share the same key. So, in this case, you need to press the “Fn + Print Screen” keys to trigger the screen capture.

But the default method is only limited to capturing screenshot of full screen and it has no additional useful functions like adding annotations and sharing the image.
III. Alternative Tool to Use
1. Snagit

One alternative to screenshot on Toshiba is Snagit. This is a well-known screen capture tool that is capable of capturing anything on the screen. It also has an image editor for enhancing captured screenshots, plus it has cloud integration in case you don’t want to keep your image in local folder. This is a decent app to use. However, it will cost you 50 dollars, which is quite expensive.
2. DuckLink Capture

This application works well in capturing objects on Toshiba’s screen. It features 4 capture modes like Window, Region, Scrolling and Full Screen. After taking a screenshot, users can enhance the image using the program’s annotation tools. It also has “Save” and “Share function” for storing image on local disk or sharing it to various social media sites.
IV. Capturing a Full Webpage
In case you want to capture a whole webpage on your Toshiba PC, then Webpage Screenshot Capture is the tool that you are looking for. This online application is designed to capture any website via its URL. Just input the webpage URL and click “Take Screenshot” on the right side of the link bar. This tool will grab the full page instantly. After capturing a whole page, you can select the image quality and format. Aside from saving the taken screenshot on local folder, you also have an option to store the image on the cloud space provided by the developer. It’s readily to use on this page.
Conclusion
This post provides several ways to screenshot on Toshiba laptops and PCs. The default way is the easiest to access, while you can use various alternatives if you want added functions like image editing, uploading and sharing. But if you need an application that can help you take screenshot without installing anything, then it is best to use Apowersoft Free Screen Capture. For a more advanced app, its pro version is worth trying for its really powerful functions illustrated above. You can also give it a shot now by downloading it.

Leave a Comment