How to Use Streaming Audio Recorder
1. Introduction
Streaming audio recorder is a versatile and practical software which enables you to record both system sound and microphone sound from the computer. Besides, it also comes with extra intelligent features, including search, download, convert and audio-to-text functions. This guide helps you to know more about this software as well as how to use it.
2. Installation
2.1 Download and Install
Simply click the button below to download and install the software.
3. Audio Settings
3.1 How to enter the settings
Click the settings icon at the top right corner of the program’s mainboard and select “Settings”. Then, you will find “General settings”, “Record settings” and “Download settings.”

3.2 General settings
Under general settings, you can choose whether to launch the program when Windows starts, or set your own shortcut keys for certain recording features. Don’t forget to click “OK” to save changes. And if you want to reset all the changes you have made for the settings and get back to the default ones, simply click “Reset dialog warnings” is alright.

Meanwhile, if the shortcut key doesn’t work, please check whether the shortcut key you have set is conflicted with the ones in other programs running at the same time, as the same hotkey combination will conflict with each other.
3.3 Record settings
Under record settings, you can select whether to identify ID3 tag information for the recorded track. Plus, make sure you have selected the sound source, quality, and format you want for the recording and click “OK” to save the changes. And you can also enter “Advanced options…” at the bottom to set automatic skipping features.

3.4 Download settings
Under download settings, you can set download configurations and output directory according to personal preferences.

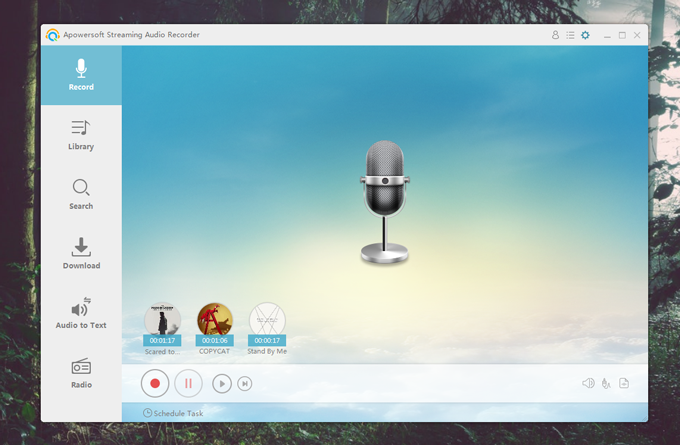
4. How to Record Sound
To record the sound, simply click the audio source icon and select the sound option you want. Next, click the red record button to start the recording is alright.

To finish the recording, click the red pause button and the recording will be saved to “Library”.

5. Task Recording
Task recording feature allows you to set the start and stop time for the recording, so that the recording will start by itself without you being there.
Click “Schedule Task” at the bottom of the mainboard.

Then, you can set the task name and all the details of how you want the recording goes. Once the configurations are set, click “Create” to confirm the task and click “OK” to exit the settings.

6. Audio Editing
Click the second menu icon at the top right corner of the program’s mainboard and choose “Audio Editor” to enter the editing panel.

6.1 Import audio file
Click “File” → click “Load file” and upload the track you want to edit.

6.2 Select track area
Simply drag the icon at the beginning and the end of the track to select an area you want to edit.

6.3 Edit Panel
To use the first three editing modes, please select a certain area and choose “Copy” first.
Paste in “Append” mode: Insert the selected area to the end of the track.
Paste in “Insert” mode: Insert the selected area to the chosen place.
Paste in “Mix” mode: Mix the selected area to the chosen place.
Delete selected part: Delete the selected area from the original recording directly.
Reduce to the selected region: Keep the selected area only.
Select all: Select the whole track.
Cancel selection: Deselect the chosen area.

6.4 Tools Panel
Please check the info below for how to use each function under Tools panel.
Insert silence: Insert a silence part at the chosen place.
Append audio files: Add a new audio track to the end of the recording.
Insert sound file: Insert a new audio track to the chosen place.
Mix sound file: Mix a new audio track to the chosen place.
Overwrite with sound file: Replace the current track.

6.5 Playing the Track
Simply follow the image below to play the selected part of the whole recording.

6.6 Export and Save the Track
Click the export icon at the bottom → Choose the format, audio quality, and saving directory for the recording → Click “OK” to save the recording.

7. Music Library
All the recorded tracks will be automatically shown at the “Library” which you can find from the left panel of the program’s mainboard.
Right-click a recorded track and you will be able to manage the audio file.

Play: Play the recording.
Add to playlist: Add the recording to the default playlist or the ones you created.
Edit: Enter the editing panel.
Convert: Convert the recording in different formats.
Add to iTunes: Add the recording to iTunes.
Identify: Automatically capture the multimedia information of the recording.
ID3 Tag Editor: Edit the title, artist, year, genre, and the cover of the recording.
Burn to CD: Burn the recording to a CD.
Rename: Change the name of the recording.
Remove: Remove the recording from the playlist, but the audio file is still saved under the default output folder.
Delete: Delete the recording file completely.
Open folder: Open the default saving folder for the recorded tracks.
Select all: Choose all the recordings at the same time.
8. Audio to Text
Click “Audio to Text” at the left panel → click “Choose file” to upload the audio file → Click “Convert” and the conversion will start right away.
Please be noted that the conversion only adapts to the recording within 30 minutes.

9. Text to Audio
Click the bottom place to exchange the “Text to Audio” mode as the image shown below → Input the texts you want to convert at the first blank → Click “Convert” and the conversion will start right away.

10. Audio Converter
Enter the second menu icon at the top right corner of the mainboard and select “Audio Converter”.

Click “Add” to upload the recording → Select the recording → Adjust the format, quality and output directory you want to set for the recording → Click “Start” to begin the conversion.

Leave a Comment